Installation Checklist For Industry Allowable Tolerances
Minimum Clearances
For Satisfactory Performance
Print the page as a jobsite worksheet. They are used
for inspection; if doors are already hung, mock-up openings, or existing
openings. If this page does not print as expected
Click Here
to download and print our PDF worksheet.
DHSI is looking to see IF there is bind, and if so, on
what opening and WHERE. "Cush 'N' Seal" should work with only one credit
card (1/32") clearance as shown. Minimum industry tolerance is 1/16".
If doors are not hung, simply write “NA” (not applicable) in place of
the door numbers.
If doors are already hung in frames, inspect five random openings for
the minimum clearances. At the bottom of this form, type in the room numbers
of the five openings inspected or write “MU” if it is a mock-up room. If any
interference occurs on either side of the door at any point, type the door #
on the illustration where the interference occurs. If there is no bind at
any door, check the box that indicates no bind was found. Complete all
requested information and submit to DHSI to register this project and
validate the performance-based warranty.
If bind occurs enter door numbers in the field provided.
The boxes will accept more than one location number. Separate door
numbers with a comma. When you hit submit, both DHSI and you will receive a
copy showing all the numbers via e-mail.
Standing on Hall Side -
Outside the Room
Bind at
Header:
Left Side
Middle
Right
Side
Hinge Side:
TOP
MID
BTM
Lock Side:
TOP
MID
BTM
Standing on Room Side - Inside the Room
Bind at
Header:
Left Side
Middle
Right
Side
Lock Side:
TOP
MID
BTM
Hinge Side:
TOP
MID
BTM
If there is any bind, these pages may show the cause.
Industry Standards & Recommended Guidelines for Installation
Installation Notes:
On door frames that have previously used teardrop seals:
The strike plate was probably die-grinded to relieve
lock pressure, which also allowed a gap for noise and
smoke to pass. If the strike plates were die
grinded, you should replace them with new strike plates
as originally fire tested.
The closing speeds of spring hinges or closers were
originally increased to overcome bind caused by teardrop
seals. "Cush 'N' Seal" works with a much lower
closing force. Decrease the tension on the spring
hinges or closers to achieve the "Quiet Latch Sealing
System."
The important point is that a door should close, latch
and seal regardless of tolerances. Installers must
notify the GC if any conditions prevent acceptable latching
and sealing. NFPA 80 recommends a clearance of 2
credit cards thickness. "Cush 'N' Seal" should work
with only 1 credit card thickness (1/ 32"). The
installers of hinges, frames and doors need to understand
that when the dimensions allowed the manufacturers are
combined with the dimensions allowed the installers, field
adjustments may be necessary. Proper inspection and
installation guidelines can help avoid problems.
PRELIMINARY ACCEPTANCE:
sample some doors and verify actual width (verify mitre to
mitre), height (for proper undercut), and distance to first
hinge (top clearance). AWI allows +/- 1/32".
Standing Outside:
The Hall Side
STEP #1 HINGE SIDE
CLEARANCE
1.1
Frames: Place a hinge in the frame and
verify that the tap plates allow the hinge to sit
perfectly flat to the rabbet.
Doors: Before installing hinges on doors
verify that the hinge backset on the door is a
minimum of 1/16" less than the frame backset. (use
an adjustable carpenter's square). The door
mfg. is allowed (AWI) +/- 1/32"
1.2
Surface of the hinge should lay flat to the
surface of the door edge. Wood door
manufacturers state that shimming or sanding, if
necessary, is standard installation procedure.
AWI allows the manufacturer +/- 1/32" on hardware
location mortise.
On hollow metal frame or hollow metal door - Are tap
plates on door or frame welded in on an angle?
1.3
Hinge should be tight in the door mortise.
NO GAP ALLOWED.
Pilot holes should be drilled for all hardware.
Pre-drill holes for hinges and lockset (mortise lock
body or latch of cylindrical lockset).
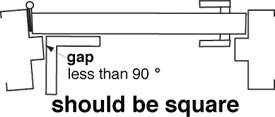
1.4
Check for twist in frame with a carpenter square.
If 1 credit card can slip in the gap as shown, the
frame is out of spec for twist by industry
standards.
STEP #2 STOP SIDE
CLEARANCE
With no rubber mutes in the frame, close the door. Latch should rattle in the frame strike plate.
If there is no rattle: is there a gap between the face of the door and the frame stop at the top or bottom?
2.1
The industry standard by the Steel
Door Institute (SDI) allows a maximum of 2 credit
cards clearance. NOTE: "CUSH 'N' SEAL" can
compensate for 8 cards out of plumb. This
measurement is more for the lock installer for
causes of bind on a latch.
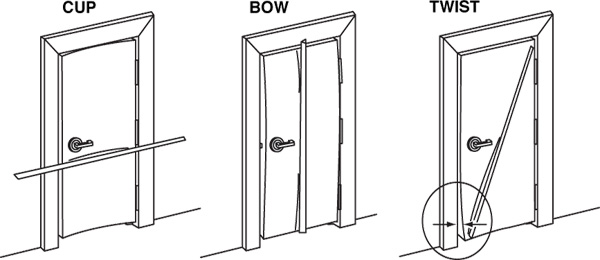
2.3
Check for cup, bow, and twist with 7'-0" straight
edge. AWI allows 1/4" measured on the Cup side
only. AWI 1300-T1.
Face of door should be parallel with plane across
faces of frame. Straight edge can be extended
beyond jack studs to qualify plumb of studs before
drywall.
Standing Inside:
The Room Side
STEP #3 SQUARE
and SPREAD (NFPA 80: 1/8" clearance at top and
sides)
Check for square on the hinge and lock jambs.
Check for a problem with latching:
3.1
If there is a gap in the square it can not
exceed 1/32"(1credit card in the 16")SDI = 1/16 in
36"
3.2
There should be a minimum clearance of 1/16"
between door edge and frame= 2 credit cards
3.3
Bottom clearance to rug: the practical
observation is that the door should self close and
latch without rug interference.
3.4
Check bottom of frame for spread. Not less
than, nor more than 2 credit cards (1/16") in 36"
NOTES:
These "Nationally
Referenced Standards" are used by code officials
and QA personnel.
No light shall pass the frame perimeter, per UL 1784 test
standard.
NFPA 80
states that no field modifications shall be made to
a fire tested component. No filing of a strike
plate is allowed. This can void the fire label
on the opening.
Consult Specifications and code requirements for
minimum STC rating on corridor doors.
IIf a fire Marshall objects to a door guard being
used to illegally prop open the fire door, if you
have banging complaints or door edge damage, or if
ADA objects, view "Secur-A-Latch" on our website.
STEP
#4 CLOSING, LATCHING, SECURING and FIELD QUALITY
ASSURANCE
Observe for slamming and if the latch does not engage
easily. Do not slam a door to make it latch. From 70
degree (ADA) open position: door should not be faster
than 3 seconds (NFPA 101) to move to within 3" from
latch, but (NFPA 80) not slower than 10 seconds.
4.1
(if closer) check valve adjustments for sweep,
latch, and backcheck. Maximum closer resistance
(ADA) Interior = 5 lbs., Exterior = 7 1/2 lbs.
4.2
(if spring hinges) check for equal tensioning on
each.
4.3
With door held open, latch of lock or panic
device should operate freely. With door closed,
torque on lever shall not exceed ADA (NFPA 101 Life
Safety) 15 inch pounds.
4.4
Check for door guard interference with seals or
flip guard engagement interference.
4.5
See note on page 2 of Installation Checklist
forms regarding teardrop seals.
Fill in the information below, and hit the submit button to
submit your information to DHSI
*Required fields
Information Received By
*Site Supervisor or Proj. Mgr:
*Openings Inspected#:
,,,,
*General Contractor:
*Project Name:
*GC Office Phone #:
*Project City/State:
*GC Email Address:
*Check Frame:
*GC City/State:
*Check Door:
Comments:
For your convenience: Your number or file name reference:
We suggest you print this page for your records before you hit the
submit button.